How to Downsize Before You Move Abroad
After the initial wave of excitement you feel from deciding to move overseas comes the dread and panic of “Oh sh*t, what do we do with all our stuff?”
But this isn’t just a problem for international moving. Whether you’re relocating to a different country or just moving down the street, moving just sucks! It’s never an easy process because we accumulate so much stuff over time and it’s stressful deciding what to do with it all.

And I’ve had my fair share of home relocation experiences over the past 2 decades…
-
- Moved cross country twice in the span of 3 years
- Moved 3 times around California in less than 1 year
- Lived in an apartment for 10 years before moving to a suburban home (which is where we currently live)
- And we’re currently preparing to move to Ireland
Besides the stress of it all, moving also isn’t cheap. While a local move may only cost you a few hundred dollars to buy some boxes and rent a truck, a cross-country move can cost up to $10,000. And international moving can cost even more if you’re not careful about downsizing ahead of time.
And that’s why it’s important to declutter as much as possible before a move (no matter long-distance it is). Despite how overwhelming the process can be, your future self will thank you for having to lug a lot less stuff and maybe even have a few more bucks in your pocket.
So here are my tips for how to downsize for any home relocation, but especially for international moving.
Act Like You Have 60 Days or Less to Move
I’d guess most people have a few months between deciding to move and actually jumping on a plane (or in a truck) and doing it. Especially for overseas moves during a pandemic which makes everything from passport renewals to work permits take longer than before. But I’d argue that more time before a move isn’t always a good thing.
Originally, we had 8 months before our move abroad – our original timeline had us moving to Ireland in Feb 2022. So for the first 2 months, we weren’t making much progress because we felt like we had all the time in the world.
Then in July, we received notice from our landlords (who knew of our plans to move out in Feb) that they were selling the house we were renting and we had 60 days to vacate. But between two trips we’d already planned and a course launch I already scheduled for my business during that time, those 60 days were actually more like 34 days. Cue panic moment!
Fortunately for us, we got the news on a Friday evening.
So while sharing an entire bottle of red wine, we developed a plan on how we thought we could pull everything off. That included accelerating our move date by 3 months and downsizing our belongings immediately.
Over the weekend, we turned the house upside down: sorting through almost every item we owned, deciding what to sell, what to donate, and what to keep. We ended up getting so much done and started the work week feeling exhausted, but accomplished. But then a funny thing happened…
Six days after receiving notice from our landlords, they changed their minds and decided to keep renting the house.
So we no longer had to find a temporary apartment. We could stay in the house… yay?
And at the time, I was PISSED!
Upset at the emotional toll the past week took on us.
Frustrated at the amount of work we had to cram into two days.
Angry that they could be so cavalier about such a major decision.
But you know what??? That crazy decluttering weekend ended up being a blessing in disguise.
Not the emotional rollercoaster of it all – I’m still pretty salty about that. But I’m grateful for having to make such quick decisions about all our stuff and proud at how much we accomplished.
Because if we had stuck to our original timeline of an 8-month prep time to declutter and downsize, there was no way we would have been so ruthless and productive. So my first and best tip is to start as early as possible and pretend as if you have to have everything out in 60 days or less. It’ll really light a fire under your bum!
SAVE ME FOR LATER – PIN IT!
Don’t Follow “Expert” Advice
I can’t tell you how many articles I read about downsizing for moving when we were in the trenches of our crazy weekend that gave advice like “get rid of 1 thing everyday” or “start with one drawer.” Geez, there were so many and it was driving me nuts!
Now I get where they are coming from: Most of us don’t enjoy decluttering and so it makes sense that experts advise us to ease into the process and then ramp up as the move gets closer. But I think that advice sucks.
Because there’s a mountain of things to do and I’ve done enough moves to know that as it gets closer, your to-do list will only get longer. So do you really want to still be decluttering days before your move OR would you rather make decent progress when you have more time?
That’s why, I’m going to give you the opposite advice: rip off the bandaid and just get started!
In fact, when talking to my husband before writing this post, he suggested decluttering using a reverse bell curve as your model. Yes, he’s super nerdy (it’s one of the reasons I love him) but I also think it’s great advice.
Instead of slowly ramping up and then back down, do the inverse and get rid of 40% of your stuff (or at least decide what you’re getting rid of) in the first few weeks. Be ruthless. Then once you know what items you’ll try to sell and which things you’ll donate, you can spend the bulk of your pre-move prep donating and selling.
The goal of using his reverse bell curve method of downsizing is that by the time you’re a few weeks away from your move, you have very little stuff left (beyond what you’re taking with you). And that allows you more time to focus on all the other move prep you have in those final days and weeks. It’s the route we’ve taken for our international move and it’s made the downsizing process run more smoothly than any other move we’ve had.
But how do you decide what to keep, what to sell, and what to donate? And when is the right time to get rid of each item? Well, that leads to my final international moving tip for you…
Focus on Utility to Decide an Item’s Fate
The best place to begin when trying to decide what to keep and what to get rid of, is to walk through your house and create an inventory of what you have.
Luckily, one of the things I’m known for in my industry is being an organizational maven and my go-to recommendation is Airtable because it’s more than just a spreadsheet and can be used on any device. I’m such a fanatic about it that I even have two Skillshare classes showing how artists can use Airtable for their businesses.
But Airtable has also come in REALLY handy for our move!
With the Airtable bases I created specifically for our move, my husband and I can keep track of not only what we’re bringing with us to Ireland and all the costs for our move, but also what we’re selling, what we’re donating, and how much money we’ve recouped from getting rid of our stuff (which is currently over $8,000).
Below is a look at the living room section of the house inventory table I built for us. During that first crazy weekend we had, we went from room to room with my iPad in tow and added all our stuff to the list.
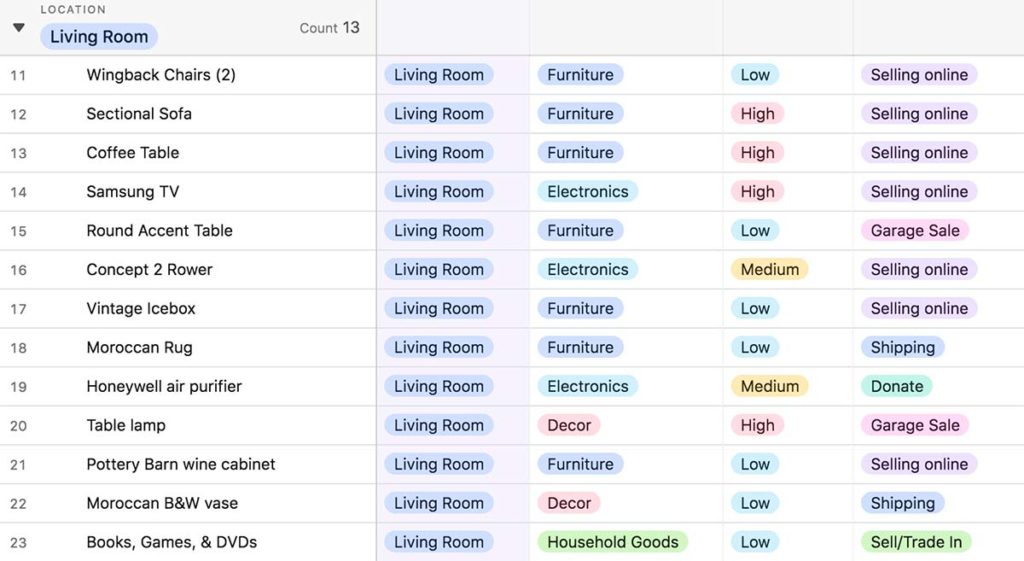
Item Name
We included brand names for some items we knew we’d be selling (that’s useful when posting to Craigslist), but it’s totally fine to keep things generic like “sectional sofa”.
It’s easiest to start with large items like furniture or power tools and work your way towards smaller items. Also, don’t feel like you have to include every single fork or shirt you own. It’s fine to simply say “t-shirts” rather than documenting each one (unless there are some extra special small items you want to call out).
Location
Where the item currently sits in your home. Don’t forget to include smaller places like hallway closets, garage or shed spaces, or attics & basements.
Category
Including an item’s category isn’t a necessity, but I found it really helpful as we delved further into the selling & donating process.
We kept things pretty simple with just a small list of categories: furniture, electronics, household goods, clothing, decor, and tools. Feel free to add in your own categories if you have a lot of something like “art supplies” or “collectibles”.
Utility
The easiest way to determine what you can get rid of first and WHEN is to assign a low, medium, or high utility to each item. If you’re not sure just think about whether you’ll use it before your move. High utility is for items you use every day or every week. Medium is for items you use on occasion and low are items you rarely use or are purely decorative.
This is where you need to be ruthless and really be honest with yourself about how much actually you use the item. And going back to the previous tip, any item marked as “low” that doesn’t have sentimental value, is something you can get rid of immediately.
Item’s Fate
After understanding how much you use each item, now it should be much easier to decide what you’ll do with everything. The standard categories for this are usually pack, sell, donate, and trash/recycle but I added in a few extra ones of my own.
Instead of just “sell,” we used 3 different options: sell online, garage sale, and trade-in. Similarly, we had 2 options for “pack”: packing (items that will be taking on the plane with us) and shipping (the small amount of stuff we’re sending via air freight). I also added a “give” option for sentimental items I was giving to friends or family.
Adding in these extra options and deciding as we went through each room was useful because having already identified which items were going where made the multi-month downsizing process easier and more efficient.
***
Phew, I know that was a lot!
Downsizing before a move can feel overwhelming, but as long as you don’t live in a 12 bedroom mansion, you should be able build an inventory and add all the big and important items to it over a long weekend or a few weekday evenings.
And the faster you get started, the faster you can start downsizing. Because nothing makes a move feel more real than seeing empty space where items from your house sat every day.
And if you want to check out Airtable, you can sign up here for a free account. Just as an fyi: I will receive a small credit towards my Airtable account if you do – but believe me, if you love organizing (or need help organizing), you’ll love it.
